How to Draw Takoyaki Step by Step
Draw Takoyaki – This comprehensive tutorial will guide you through the process of drawing Takoyaki in nine detailed steps, focusing on a style that fits anime and manga, while also being adaptable to other artistic expressions. Takoyaki, a popular Japanese street food, is frequently depicted in anime, appearing in scenes from festivals to casual character interactions.
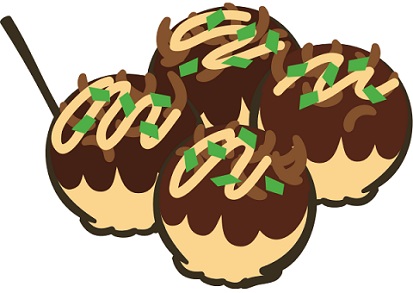
These octopus-filled balls are often garnished with sauces and bonito flakes, adding to their visual appeal. While drawing Takoyaki might seem straightforward initially, capturing its detailed texture and presentation can be intricate. This guide provides a thorough breakdown to facilitate an enjoyable and successful drawing experience.
Understanding Takoyaki
Takoyaki, literally meaning “grilled octopus,” originated in Osaka, Japan, and has become a beloved snack throughout the country. It consists of a batter filled with diced octopus, tempura scraps, pickled ginger, and green onions, cooked in a specially molded pan.
Once cooked, the balls are typically brushed with a savory sauce and mayonnaise, and sprinkled with aonori (seaweed flakes) and bonito flakes. This combination creates a unique and delicious flavor profile, making it a popular feature in various anime and manga.
Step-by-Step Instructions
Step 1: Design a Takoyaki Container
- Draw the Container: Begin by sketching a small cardboard container that will hold the Takoyaki balls. This container should resemble a vertical pyramid with sides flaring outward, commonly used at festivals and street stalls.
- Perspective: Utilize a 3/4 view with a two-point perspective. This approach ensures the container appears smaller as it recedes into the distance, adding depth to your drawing. Initially, draw the container as if it’s transparent, allowing you to visualize and align all sides accurately.
Step 2: Define Takoyaki Balls
- Position the Balls: Draw six Takoyaki balls within the container. These should be slightly irregular in shape to convey a natural and realistic appearance, as perfectly round shapes can look artificial.
- Placement Considerations: Ensure the balls fit snugly within the container. Adjust their size and position as needed, and don’t hesitate to erase and redraw if necessary. This stage is crucial for achieving a balanced composition.
Step 3: Clean Up Drawing
- Erase Overlapping Lines: Once the Takoyaki balls are positioned correctly, erase the lines of the container that are hidden by the balls. This will result in a clean line drawing, setting a solid foundation for the subsequent steps.
Step 4: Draw the Sauce
- Add Sauce Details: Sketch the sauce generously covering the tops and sides of the Takoyaki balls. The sauce should appear slightly voluminous and glossy, with a “padded” look on top to suggest thickness. Erase any underlying lines where the sauce overlaps the balls.
Step 5: Draw Flakes
- Sprinkle Flakes: Add small, irregular shapes across the Takoyaki balls to represent the bonito flakes. These should resemble folded paper rectangles, distributed randomly yet evenly, to maintain a balanced visual appeal.
Step 6: Add Sticks and Complete Line Drawing
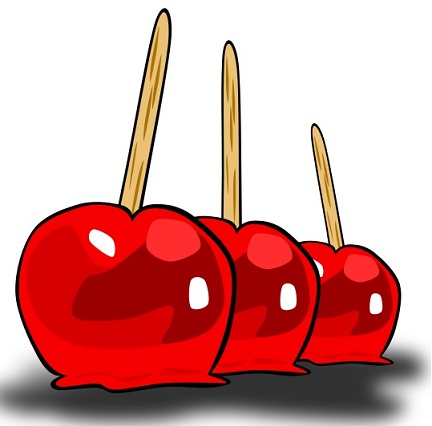
- Draw Sticks: Include a few toothpick-like sticks inserted into some of the Takoyaki balls, enhancing the authenticity and suggesting that they’re ready to be eaten.
- Finalize Lines: Carefully review your drawing for balance and accuracy, then darken the lines to complete the outline. This step solidifies the drawing’s structure and prepares it for coloring.
Step 7: Color the Takoyaki
- Apply Base Colors: Use a harmonious blend of orange, yellow, and brown for the Takoyaki balls, with a rich dark brown for the sauce. This palette enhances the food’s warmth and appetizing appearance.
- Gradient Effect: Create a subtle gradient effect, with lighter colors on the left and darker shades on the right, simulating a light source. Use light yellow or brown for the sticks to convey a wooden texture.
Step 8: Add Shading to the Container
- Shade the Container: Although the container is white, adding shading is crucial for depth. Assume a light source from the upper left, making the left side lighter and the right side darker. The inside of the container should be darker due to the shadow cast by the Takoyaki balls.
Step 9: Add Shading to Takoyaki
- Enhance with Shadows: Introduce shadows beneath the sauce and under the Takoyaki balls to emphasize their three-dimensional form. Add small shadows to some flakes for added realism. Refer to a detailed drawing of a single Takoyaki ball to visualize shadow placement effectively.
Conclusion
Takoyaki is a beloved staple in anime and manga scenes, but drawing it with detailed accuracy can be time-consuming. This tutorial provides a structured approach to capturing its textured and appetizing appearance. Remember, even in professional settings, food in anime is often simplified once the characters begin eating. Take your time, enjoy the process, and don’t be discouraged if it takes a while to perfect your drawing. With practice, you’ll be able to create visually appealing representations of this iconic dish, enhancing your artistic repertoire.
Special Keywords – Takoyaki Painting, Anime Food Drawing, Sushi Painting, Visual Art
Thanks for Visiting Our Website – Easy Anime Drawings

provigil over the counter buy generic provigil provigil 200mg for sale provigil 100mg uk modafinil 200mg cost buy modafinil 100mg online generic modafinil 200mg