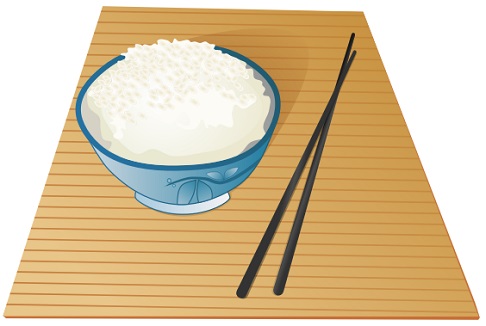
How to Draw a Rice Bowl Step by Step
Draw a Rice Bowl – This tutorial will guide you through drawing a rice bowl in a style that fits anime and manga, while also being adaptable to other artistic styles. A bowl of rice is a staple in many anime and manga scenes, often depicted as a comforting and filling meal enjoyed by characters of all ages.
Understanding the Rice Bowl in Anime
In anime and manga, a bowl of rice often symbolizes simplicity and nourishment, making it a common feature in scenes set in home kitchens, traditional Japanese settings, or casual dining contexts. Mastering the depiction of a rice bowl can add authenticity and cultural depth to your artwork.
Step-by-Step Instructions
Step 1: Draw the Bowl
- Outline the Bowl’s Shape: Start by drawing an oval to represent the top edge of the bowl. The oval should be wide enough to suggest a full serving of rice.
- Draw the Bowl’s Body: Extend two lines downward from the sides of the oval to form the sides of the bowl. These lines should taper slightly inward as they go down.
- Base of the Bowl: Connect the two lines at the bottom with a curved line to form the base, completing the bowl’s shape.
Step 2: Add Rice to the Bowl
- Draw the Rice Surface: Inside the oval, sketch a bumpy line to represent the top layer of rice. This line should be uneven, with slight peaks and valleys to mimic the texture of rice.
- Depth and Volume: Add a few more lines within the bowl to give the rice depth and volume, suggesting a heaping serving.
Step 3: Add Details to the Rice
- Rice Grains Texture: Using small, irregular shapes, add texture to the rice surface. These shapes should vary in size and placement to capture the random arrangement of rice grains.
- Highlight Areas: Leave small gaps in the texture to indicate highlights, which will give the rice a glossy, appetizing appearance.
Step 4: Refine the Bowl’s Features
- Detail the Rim: Thicken the line of the oval slightly to emphasize the rim of the bowl. This adds dimension and realism.
- Inner and Outer Lines: Draw a parallel line inside the bowl’s rim to suggest thickness. Add subtle lines on the bowl’s body to indicate curvature and form.
Step 5: Add Color
- Color the Rice: Use a soft white or cream color for the rice, ensuring that the highlights remain brighter to stand out.
- Shade the Bowl: Depending on the material, color the bowl with shades that suggest ceramic or porcelain. Common colors include blues, greys, or simple whites with decorative patterns.
Step 6: Apply Shading
- Light Source: Assume a light source from above, adding shadows to the lower parts of the rice and the inner sides of the bowl.
- Depth and Contrast: Use darker shades for the shadows to enhance the depth and three-dimensionality of the bowl.
Step 7: Final Touches
- Add Subtle Highlights: On the bowl’s outer surface, add subtle highlights to mimic reflections from the light source.
- Enhance Texture: Revisit the rice texture, adding finer details where necessary to enhance realism.
Conclusion
Drawing a rice bowl in an anime or manga style involves capturing the simplicity and texture that make this staple food so appealing. By focusing on the bowl’s shape, the rice’s texture, and appropriate shading, you can create a visually satisfying representation that complements a wide range of scenes. Practice these steps to refine your technique and bring an authentic touch to your culinary illustrations.
Special Keywords – How To Draw a Rice, Drawing of Rice Seed, How To Draw Meat, How To Draw Raw Rice
Thanks for Visiting Our Website – Easy Anime Drawings


buy generic provigil 100mg buy provigil 100mg online buy modafinil paypal generic modafinil provigil 100mg sale order modafinil 200mg online cheap order modafinil