How to Draw an Anime Boy Full Body Step by Step
How to Draw an Anime Boy Full Body – Anime characters often have distinct features that make them instantly recognizable and engaging. Drawing a young male anime character involves capturing these unique traits while understanding body proportions and styling. This guide will walk you through creating a detailed full-body drawing of an anime boy, covering everything from initial sketches to final shading.
Step 1: Understanding Body Proportions
When drawing an anime boy, particularly one who is between 10-15 years old, it’s crucial to consider body proportions that suggest youth and vitality. Younger characters often have larger heads in relation to their bodies, giving them a more youthful appearance.
1.1 Head-to-Body Ratio
- The typical anime character has a larger head compared to realistic proportions. For a young boy, the head-to-body ratio is approximately 1:6.5.
- This means the character’s height is roughly six and a half times the length of the head.
1.2 Arm Lengths
- Measure the length from shoulder to elbow and elbow to wrist; these should be approximately equal.
- The fingertips should reach about halfway down the thighs when the arms are at the sides.
1.3 Leg Lengths
- Legs account for about half of the total body height.
- The distance from the hip to the knee and the knee to the ankle should be roughly equal.
Step 2: Sketching the Basic Body Outline
Start by lightly sketching the basic outline of the character’s body. Use simple shapes to define the structure and ensure symmetry and proportion.
2.1 Drawing the Head
- Begin with a circle for the head and add a chin to create a slight oval shape.
- Draw a vertical guideline down the center to help with symmetry.
2.2 Adding the Torso
- Draw a vertical line for the spine and use it to construct the torso.
- The torso should be slightly narrower at the waist and wider at the shoulders.
2.3 Defining the Arms
- Sketch the arms using cylinders or simple lines to define the upper and lower arms.
- Position the arms slightly away from the body to create a natural stance.
2.4 Constructing the Legs
- Use elongated cylinders for the legs, paying attention to the equal division between the upper and lower sections.
- Ensure the legs are slightly apart to suggest balance and stability.
Step 3: Refining the Body Shape
Once the basic outline is complete, refine the body shape by adding curves and details to the sketch.
3.1 Refining the Head and Neck
- Add details to the head shape, such as the jawline and neck.
- Ensure the neck is proportionate to the head and torso, slightly curving inward.
3.2 Enhancing the Torso
- Refine the shoulder and chest area, adding slight curves to suggest muscle definition.
- Draw the waist with a slight inward curve to enhance the youthful appearance.
3.3 Detailing the Arms and Hands
- Add more definition to the arms, considering the natural muscle structure.
- Sketch the hands with care, using basic shapes to outline the fingers and palm.
3.4 Shaping the Legs and Feet
- Refine the legs by adding muscle definition, particularly around the thighs and calves.
- Draw the feet using simple shapes to outline the toes and arch.
Step 4: Drawing the Face and Features
The face is crucial in anime for conveying character and emotion. Focus on the placement and shape of facial features.
4.1 Positioning Facial Features
- Draw horizontal guidelines to place the eyes, nose, and mouth.
- Position the eyes about halfway down the head, with the nose and mouth below.
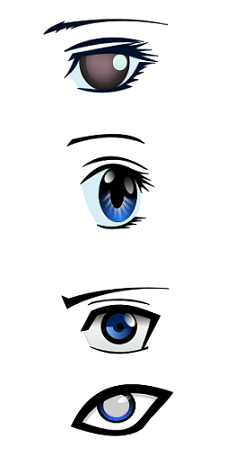
4.2 Drawing the Eyes
- Anime eyes are typically large and expressive. Start with an oval shape and add details like irises, pupils, and highlights.
- Ensure the eyes are symmetrical and proportionate to the head.
4.3 Adding the Nose and Mouth
- The nose is usually understated in anime. Use a small line or dot to represent it.
- Draw the mouth as a simple curve, adjusting for expression.
4.4 Detailing the Hair
- Sketch the hair with volume, using dynamic lines to suggest movement and style.
- Consider the character’s personality when designing the hairstyle.
Step 5: Designing Clothes
Clothing helps define a character’s personality and role. Draw clothes that fit well and add depth to the character.
5.1 Drawing a T-Shirt
- Sketch a T-shirt with a loose fit, adding folds and creases where it hangs naturally.
- Ensure the sleeves are slightly loose for a casual appearance.
5.2 Adding Shorts
- Draw shorts that sit comfortably on the waist, with a slight flare at the hem.
- Add details like pockets or stitching for realism.
5.3 Drawing Shoes
- Outline simple sneakers or shoes, considering the shape and style.
- Add details such as laces or treads to enhance realism.
Step 6: Adding Details and Accessories
Enhance the drawing with additional details and accessories that bring the character to life.
6.1 Detailing the Face
- Add eyebrows, eyelashes, and any other facial details that add expression.
- Consider adding subtle blush or freckles for character.
6.2 Enhancing Clothing with Details
- Add seams, folds, and wrinkles to the clothing for a realistic look.
- Consider adding accessories like hats, watches, or jewelry.
Step 7: Coloring and Shading
Coloring and shading add depth and vibrancy to the drawing.
7.1 Applying Base Colors
- Use a light color palette for the skin, hair, and clothing.
- Ensure colors are consistent and complement the character’s design.
7.2 Adding Shading
- Apply shading to areas that would naturally be in shadow, such as under the chin, inside the sleeves, and beneath the shorts.
- Use a soft, even gradient to blend shadows smoothly.
Step 8: Final Touches and Refinement
Review the drawing for any final touches or corrections to enhance overall quality.
8.1 Refining Lines and Details
- Go over the drawing with clean, crisp lines to define the outlines.
- Add any final details or corrections to improve symmetry and proportion.
8.2 Final Review
- Step back and assess the drawing as a whole. Make any necessary adjustments to balance and harmony.
- Consider the character’s expression and posture to ensure they convey the intended emotion and personality.
Conclusion
Drawing a full-body anime boy involves understanding proportions, facial features, and clothing design. By following these detailed steps, you can create a dynamic and expressive character that captures the essence of anime style. Practice regularly and experiment with different poses and styles to develop your unique approach. Enjoy the process of bringing your anime character to life!


buy provigil tablets generic provigil order modafinil without prescription where can i buy provigil provigil drug cheap modafinil 200mg buy generic provigil 100mg