How to Draw a Chibi Anime Character Step by Step
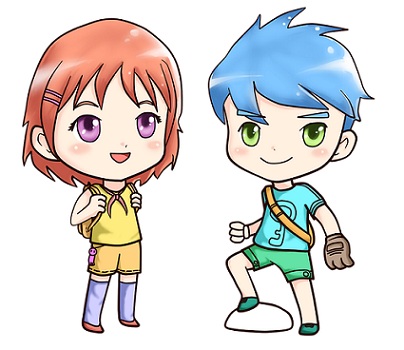
Draw a Chibi Anime Character – This tutorial provides a comprehensive guide on drawing a female chibi anime character, characterized by a big head and a small body. Chibi characters are often used for their simplicity and expressiveness, making them ideal for quick storyboards, manga, or animations. Their oversized heads and minimalistic bodies make them charming and easy to draw.
Understanding Chibi Characters
Chibi characters, with their exaggerated proportions, are a popular style in anime and manga. They often feature large heads, small bodies, and simplified facial features, allowing for expressive and endearing designs. This tutorial will guide you through creating a chibi character, focusing on body proportions and facial feature placement.
Step-by-Step Instructions
Step 1: Establish Body Proportions
- Body Measurements: Begin by drawing a character whose body is approximately one and a half times the length of the head. This proportion gives the character its chibi appearance.
- Simplified Limbs: Draw the torso and legs evenly, with arms and legs that are short and stubby. Hands and feet can be drawn without detailed fingers or toes, resembling mittens.
Step 2: Draw the Face
- Facial Features: Position the eyes lower on the face for a youthful and cute appearance. Chibi characters often lack a visible nose, simplifying the design.
- Ears and Eyebrows: Although ears are included for reference, they will be covered by hair later. Draw simple eyebrows above the eyes.
Step 3: Draw the Hair
- Voluminous Hair: Chibi characters often have detailed hair despite their large head proportions. Draw the hair following the head’s shape, with large, thick strands extending outward.
- Erase Overlaps: Remove any parts of the head covered by hair, but leave facial features like eyebrows visible for potential hairstyle changes.
Step 4: Draw the Clothing
- Simplified Clothing: Chibi clothing is often minimalistic, with few details or folds. Draw the character wearing a school uniform, with a simple top, skirt, and shoes.
- Fit to Body Shape: Ensure the clothing fits the simplified body shape, with flowing sleeves and a skirt that accentuates the character’s proportions.
Step 5: Complete the Line Drawing
- Add Details: Refine the drawing by adding pupils, irises, and highlights to the eyes. Include small blush marks on the cheeks for added cuteness.
- Clothing Details: Add buttons or simple patterns to the clothing for interest.
Step 6: Apply Color and Shading
- Base Colors: Fill each area with the appropriate colors. For paper drawings, leave highlights in the eyes, hair, and buttons white. For digital art, add highlights after coloring.
- Add Shading: Apply shadows to enhance depth and dimension:
- Darken the neck area.
- Add shadows from the hair over the eyes.
- Shade the legs where the skirt casts a shadow.
- Add small shadows on the hands from sleeves.
- Darken the top of the irises for depth.
- Shade above the eyes’ whites from eyelash shadows.
Step 7: Final Touches
- Refinement: Darken the shadows and highlights as needed to create a polished look. Use the shading to define the shapes and add contrast.
Conclusion
Drawing chibi characters involves capturing their unique proportions and expressiveness. By focusing on simple shapes and exaggerated features, you can create charming and delightful characters. This tutorial offers a foundational approach to drawing chibi characters, allowing for experimentation and personalization to develop your unique style.


buy provigil 100mg online cheap order provigil 100mg pill order modafinil 100mg pills cheap provigil 200mg modafinil 200mg usa cost provigil buy provigil 100mg