How to Draw Male Anime Face in 3/4 View Step by Step
Draw a Male Anime Face – This tutorial provides a detailed guide on drawing a male anime face in a 3/4 view. This perspective can be challenging due to its complexity in capturing depth and proportion. However, by breaking down the process into sixteen detailed steps, you will be able to create a balanced and expressive anime character.
Step-by-Step Instructions
Step 1: Draw the Top of the Head
- Circle and Guidelines: Begin with a circle to represent the top of the head. Visualize this circle as a 3D sphere. Within it, draw an angled slice like an apple to establish the head’s center and orientation.
Step 2: Draw the Face Center Line
- Center Line: Erase the half of the oval facing away. Extend a straight line from the front of the circle, representing the face center. This line should angle slightly backward and extend below the chin to guide facial features.
Step 3: Draw the Chin
- Face Outline: Anime faces typically have minimal chins. Draw the chin with a slight flatness at the bottom to suggest masculinity.
Step 4: Draw the Neck
- Neck and Shoulders: Though the focus is the face, add a neck and slight shoulder suggestion. The neck should angle slightly forward, visible in the 3/4 view.
Step 5: Draw the Ear
- Ear Placement: Place the ear on the side of the head, aligning its top with the horizontal midpoint of the head.
Step 6: Draw the Eyes
- Eye Frame: Sketch the eye frames, aligning their tops with the ear’s top and the horizontal midpoint.
- Perspective: The eye closer to the viewer should be wider and farther from the face center line.
Step 7: Draw the Eyebrows
- Eyebrow Placement: Position eyebrows above the eyes, drawing them thicker for a masculine look. The closer eyebrow should be wider and positioned further from the face center line.
Step 8: Draw the Nose
- Nose Detail: Sketch a simple nose with a single line or dot to maintain an anime style. Align the bottom of the nose with the lower ear level.
Step 9: Draw the Mouth
- Mouth Placement: Position the mouth so its lower lip is between the nose and chin. For masculinity, draw the mouth wider with a slight break in the line for realism.
Step 10: Clean the Drawing
- Refinement: Erase construction lines, leaving a clean outline of the head and face without hair or minor details.
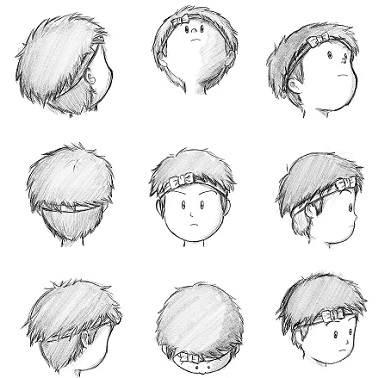
Step 11: Draw the Front Hair
- Hair Sections: Divide the hair into front, sides, and back. Start with the front, drawing large, flowing tufts for a natural look.
Step 12: Draw the Side Hair
- Side Hair: Add side sections with tufts reaching near the nose. The head will obscure part of the hair in the back view.
Step 13: Draw the Back Hair
- Back Hair: Complete the hair with large clumps at the top and smaller ones at the bottom.
Step 14: Add Facial Details
- Eye and Ear Details: Erase hidden parts and add inner eye and ear details. Draw pupils, highlights, and eyelids for expressiveness.
Step 15: Color the Drawing
- Color Application: Use colors for the hair, skin, and eyes. Leave highlights in the hair for shine, and ensure the upper parts of the eyes have a darker shade for depth.
Step 16: Add Shading
- Shading: Apply basic shading to areas like under the hair, around the eyes, and beneath the nose and chin. This enhances the three-dimensional aspect and adds realism.
Conclusion
Drawing a male anime face in a 3/4 view requires careful attention to proportion and depth. By following these detailed steps, you can achieve a balanced and expressive character. Practice these techniques to refine your skills and enhance your ability to capture diverse perspectives in your anime illustrations.
Thanks for Visiting Our Website – Easy Anime Drawings


buy provigil 200mg pill buy modafinil 200mg online cheap brand modafinil 200mg where to buy modafinil without a prescription buy provigil 200mg for sale modafinil 100mg tablet order provigil 200mg sale